الأربعاء، 13 يناير 2016

HTML5 Game Development


                       HTML5                Game
_________
                        Development             ______________________________________
__________________________________________________
Project 1: Building a CSS Quest Game 
In this project, we are going to build a card quest game using HTML elements and CSS styling.
We will also learn how to separate JavaScript logic into modules for clarity. We will build the
game from scratch with a basic HTML layout and then represent the composition of the pattern
in logic and CSS.
Mission briefing
We are going to create a matching game. This game presents a combination of patterns to
the player, and some of these patterns overlap each other. Players analyze the patterns and
then select them in the correct sequence so that the composition matches the provided one.
You may visit the URL http://makzan.net/html5-games/color-quest/ to play the
example game in order to have a better understanding of what we will build throughout
this project.

Why is it awesome  
A simple matching game like this is a perfect way to get you warmed up with the HTML5
games' development rhythm. What we will learn in this project is the foundation to build
more complicated games later in this book.
This game uses what we are familiar with: HTML element interaction and styling in CSS.
What's new, is JavaScript logic. This project will show us how to convert the game rule into
code. We will also learn how to separate logic into different parts with different responsibilities.


We'll perform the following tasks in this project:
  Creating the HTML structure
 f Managing the game scenes
 Representing the quest pattern composition
  Placing the patterns on the deck
ff Selecting the pattern
  Comparing players and compositions of the quest
  Showing different quests
  Counting down the game


Mission checklist
In this game, we are going to stick to plain JavaScript without using a library. This will help us
get started with a basic foundation in JavaScript.
Note that writing JavaScript for games is a little bit different from writing it for a web page.
Game logic requires well-structured code to ensure the logic is easy to read and maintained.
The following essays provide an in-depth discussion on writing JavaScript in the right way:
ff JavaScript best practices:
http://www.thinkful.com/learn/javascript-best-practices-1/
ff JavaScript the right way: http://www.jstherightway.org
Creating the HTML structure
In this task, we are going to kick-start the project by creating the file structure, ensuring that
the essential files are ready.
Prepare for lift off
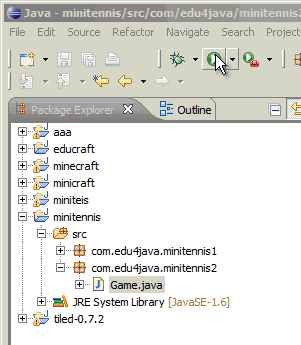
We need several things to get started. First, we will create an empty project directory.
Then, we will create an index.html file, a folder where we will put the CSS styling files,
and a folder to put the JavaScript logic files in.


During the missions, we need several graphics files, including the background and buttons;
you can find the graphics from the sample code. Put all the images into a directory named
images. The created file structure is shown in the following screenshot:
Engage thrusters
Use the following steps to create the basic game structure:
1. We will enter the following HTML code in the index.html file. It is a basic HTML
structure that includes the CSS file in the head and the script tag at the bottom:
<!DOCTYPE html>
<html lang='en'>
<head>
<meta charset='utf-8'>
<title>Color Quest</title>
<link rel="stylesheet" href="game.css">
</head>
<body>
<!-- game content here -->
<script src='js/game.js'></script>
</body>
</html>
2. Right after the opening of the <body> tag and before our <script> tag, we add
the following HTML code for the game page. The content is divided into four parts:
header, game section, the how-to-play section, and footer. The game section is
where all the game logic happens. The #element-template is the template of
game elements that will be used for cloning later:
<header>
<div class="row">
<h1>Color Quest</h1>
</div>
</header>
Project 1
11
<section id="game">
</section>
<section class='how-to-play'>
<div class="row">
<h2>How to Play?</h2>
<p>Composite your card to match the given
pattern.</p>
</div>
</section>
<footer>
<div class="row">
<p>This game is an example for the HTML5 Games
Hotshot book. Free for personal and commerical
use.</p>
</div>
</footer>
<div id='element-template'>
</div>
3. Add the following JavaScript to the game.js file. It acts as the entry point of the
game logic:
(function(){
// Entry Point
var init = function() {
};
init(); // start the game
})(); // self-executing function.
Downloading the example code
You can download the example code files for all Packt books you have
purchased from your account at http://www.packtpub.com. If you
purchased this book elsewhere, you can visit http://www.packtpub.
com/support and register to have the files e-mailed directly to you.
Building a CSS Quest Game
12
Objective complete – mini debriefing
We have created a very basic structure of the game. The following sections explain what we
have done.
HTML structure
The header, section, and footer arrangement follows a simple HTML5 content structure.
We will put the game elements inside this structure, attached to the game. The following
screenshot shows the HTML structure:
Modularizing the logic
We separate the JavaScript logic into modules, and each separated file encapsulates one
module. This allows us to tackle each part individually. The first JavaScript file we have is
the game.js file. It is in charge of controlling the game flow. There are other different
parts in this game, and for these parts, we are going to create different files with the
purpose of using them for future tasks.
Project 1
13
Variable scope in JavaScript
In JavaScript, we want to have as few global variables as possible. Variables are global when
they are attached to the highest scope of the runtime environment. In a web browser, this
refers to a variable that is attached to a window scope. A variable that is created with the
var keyword lives inside the scope of the function that encloses it.
This is why we put all the logic inside a self-executing anonymous function. This ensures that
by default, we will not pollute the global scope with our game logic variables. The following
code block shows how to create each module with one global game variable and one local
game variable inside a self-executing-anonymous function:
(function(){
var game = this.colorQuestGame = this.colorQuestGame || {};
})();
We will intentionally create one global variable named colorQuestGame to act as the
namespace. In the later sections, we will put different logic modules into different files
under the same global object.
The this.colorQuestGame || {}; declaration means that, by default, it will use the
existing colorQuestGame variable if it was already declared previously. Otherwise, it will
be a new empty object. We will put this line of declaration into every file.
This scoping feature is also useful when we need to encapsulate logic into private functions.
For example, the following code shows how we can create private functions that are only
accessible inside a specific scope to help extract the code:
Composition.createFromSequence = function(sequence) {
// helper functions
var privateHelperA = function() {}
var privateHelperB = function() {}
// end helper functions
// use your private helper functions here.
}
Inside any method, we can declare local scoped functions to help extract the logic and to
make the code more readable.
Classified intel
For performance, we usually place scripts at the end of Document Object Model (DOM)
and just before the closing of the </body> tag. This is because script loading may block the
loading of DOM and cause the webpage to load slower. For more details, please have a look
at the Yahoo performance rule, Put Scripts at the Bottom, at http://developer.yahoo.
com/performance/rules.html#js_bottom.
Building a CSS Quest Game
14
Managing the game scene
In this task, we create four scenes and display different scenes based on the game flow.
Prepare for lift off
The following figure is our planning of the four scenes and the flow, showing on how they
should link together:
summary scene gameover scene
start scene game scene
Project 1
15
The following figure shows three scenes of what we will create in this task:
Engage thrusters
We code the management part of the scene via the following steps:
1. The scenes are DOM elements, so we will have the following HTML elements
defined inside the tag with the game ID:
<div id="game-scene" class="scene out">
<a href="#" id="gameover-btn">Game Over</a>
<a href="#" id="finish-btn">Finish</a>
</div>
<div id="start-scene" class="scene">
<a href="#" id="start-btn" class="button">
Start Game</a>
</div>
<div id="summary-scene" class="scene out">
<a href="#" id="next-level-button"
class="button">Next</a>
</div>
<div id="gameover-scene" class="scene out">
<a href="#" id="back-to-menu-button"
class="button">Back to menu</a>
</div>
2. Now, we need to import our newly created scenes.js file into the HTML file,
before the game.js file:
<script src='js/scenes.js'></script>
<script src='js/game.js'></script>
</body>
Building a CSS Quest Game
16
3. In the scene.js file, we add the following code to define the scene's object and
its instances:
(function(){
var game = this.colorQuestGame = this.colorQuestGame ||
{};
// put common scene logic into 'scene' object.
var scene = {
node: document.querySelector('.scene'),
show: function() {
this.node.classList.remove('out');
this.node.classList.add('in');
},
hide: function() {
this.node.classList.remove('in');
this.node.classList.add('out');
}
};
// scene instances code to go here.
)();
4. Then, we create an instance of the game scene. Put the following code right after
the scene object code. The following code creates two temporary links to finish
the level and complete the game:
var gameScene = game.gameScene = Object.create(scene);
gameScene.node = document.getElementById('game-scene');
gameScene.handleInput = function() {
document.getElementById('finish-btn').onclick = function(){
game.flow.finishLevel();
};
document.getElementById('gameover-btn').onclick = function(){
game.flow.gameOver();
};
};
5. The start scene instance comes after the game scene code. The following code
handles the clicking of the start button that links to the game scene:
var startScene = game.startScene = Object.create(scene);
startScene.node = document.getElementById('start-scene');
startScene.handleInput = function() {
document.getElementById('start-btn').onclick = function(){
game.flow.nextLevel();
};
};
Project 1
17
6. Then, we have the summary scene. The summary scene has a button that links to
the game scene again to show the next level:
var summaryScene = game.summaryScene =
Object.create(scene);
summaryScene.node = document.getElementById('summaryscene');
summaryScene.handleInput = function() {
document.getElementById('next-level-button')
.onclick = function() {
game.flow.nextLevel();
};
};
7. At last, we add the game over scene code to the scenes.js file. When the game is
over, we bring the player back to the menu scene after the back button is clicked:
var gameoverScene = game.gameoverScene = Object.create(scene);
gameoverScene.node = document.getElementById('gameover-scene');
gameoverScene.handleInput = function() {
var scene = this;
document.getElementById('back-to-menu-button').onclick =
function() {
game.flow.startOver();
};
};
8. Now, we will define a game flow in the game.js file that will help us control how to
show and hide the scenes:
// Main Game Logic
game.flow = {
startOver: function() {
game.startScene.hide();
game.summaryScene.hide();
game.gameoverScene.hide();
game.gameScene.hide();
game.startScene.show();
},
gameWin: function() {
game.gameScene.hide();
game.summaryScene.show();
},
gameOver: function() {
game.startScene.show();
game.gameScene.hide();
game.gameoverScene.show();
},
Building a CSS Quest Game
18
nextLevel: function() {
game.startScene.hide();
game.summaryScene.hide();
game.gameScene.show();
},
finishLevel: function() {
game.gameScene.hide();
game.summaryScene.show();
},
}
9. The init function is the entry point of the game. Inside this function, we will
register the click input listeners:
var init = function() {
game.startScene.handleInput();
game.summaryScene.handleInput();
game.gameoverScene.handleInput();
game.gameScene.handleInput();
}
10. At last, we need some styling for the scenes to make them work. Put the following
CSS rules at the end of the game.css file:
#game {
width: 480px;
height: 600px;
margin: 0 auto;
border: 1px solid #333;
text-align: center;
position: relative;
overflow: hidden;
}
.scene {
background: white;
width: 100%;
height: 100%;
position: absolute;
transition: all .4s ease-out;
}
.scene.out {top: -150%;}
.scene.in {top: 0;}
.button {
width: 145px;
Project 1
19
height: 39px;
display: block;
margin: auto;
text-indent: 120%;
white-space: nowrap;
overflow: hidden;
background-repeat: no-repeat;
}
.button:hover {
background-position: 0 -39px;
}
.button:active {
background-position: 0 0;
}
#start-scene {background: url(images/menu_bg.png);}
#start-btn {
background-image: url(images/start_btn.png);
margin-top: 270px;
}
#game-scene {background: url(images/game_bg.png);}
#game-scene.out {
opacity: 0;
top: 0;
transition-delay: .5s;
}
#summary-scene {background: url(images/summary_bg.png);}
next-level-button {
background-image: url(images/next_btn.png);
margin-top: 370px;
}
#summary-scene.in {
transition-delay: .5s;
}
#gameover-scene {
background: url(images/gameover_bg.png);
}
#back-to-menu-button {
background-image: url(images/restart_btn.png);
margin-top: 270px;
}


السبت، 2 مايو 2015

Game programming: JFrame, JPanel, paint method

Game programming: JFrame, JPanel, paint method

To paint something we first need a surface where to paint on. This surface or canvas where we are going to paint our first example is a JPanel object. In the same way a canvas needs a frame to hold it, our JPanel will be framed in a window made by the JFrame class.

JFrame: The window

The following code creates a window "Mini Tennis" of 300 pixels by 300 pixels. The window won´t be visible until we call setVisible(true). If we don´t include the last line "frame.setDefaultCloseOperation(JFrame.EXIT_ON_CLOSE)", when we close the window the program won´t finish and will continue running.
package com.edu4java.minitennis1;
import javax.swing.JFrame;

public class Game {
 public static void main(String[] args) {
  JFrame frame = new JFrame("Mini Tennis");
  frame.setSize(300, 300);
  frame.setVisible(true);
  frame.setDefaultCloseOperation(JFrame.EXIT_ON_CLOSE);
 }
}
If we run it we will obtain:
With these few instructions we will obtain a window which can be maximize, minimize, change it´s size with the mouse, etc. When we create a JFrame object we start an engine which manages the user interface. This engine communicates with the operative system both to paint in the screen as to receive information from the keyboard and from the mouse. We will call this engine "AWT Engine" or "Swing Engine" because it is made by these two libraries. In the first java versions only AWT existed and then Swing was added. This engine uses several threads.

What is a thread in java?

A program is executed by just one processor, line by line. Threads allow a program to start several executions at the same time. This is as if, there were several processors running at the same time their own sequence of instructions.
Even though threads and concurrence are very powerful tools, there can be problems when two threads enter the same variables. It is interesting to think that two threads can be running the same code at the same time.
We can think that a thread is like a cook preparing a dish reading a recipe. Two concurrent threads would be like two cooks working in the same kitchen, preparing one dish with the same recipe o with differents recipes. The problems come when both try to use the same frying pan at the same time.

AWT Engine and Thread AWT-EventQueue

The AWT Engine starts several threads which can be seen if we start the aplication with debug and we go to the debug perspective. Each thread is as if it was an independent program running at the same time as the other threads. Further on we will see more about threads, meanwhile I am only interested that you remember the third thread we see in the debug view called "Thread [AWT-EventQueue-0]" this thread is the one in charge of painting the screen and receiving the mouse and keyboard events.


JPanel: The canvas

To be able to paint we want to know WHERE and where is an JPanel object which will be included in the window. We extend the JPanel class to be able to overwrite the paint method which is the method called by the AWT Engine to paint what appears in the screen.
package com.edu4java.minitennis1;
import java.awt.Color;
import java.awt.Graphics2D;
import java.awt.Graphics;
import java.awt.geom.Ellipse2D;
import java.awt.RenderingHints;
@SuppressWarnings("serial")
import javax.swing.JFrame;
import javax.swing.JPanel;
public void paint(Graphics g) {
public class Game2 extends JPanel {
Graphics2D g2d = (Graphics2D) g;
@Override
g2d.fillRect(50, 0, 30, 30);
g2d.setColor(Color.RED);
g2d.fillOval(0, 0, 30, 30);
g2d.drawOval(0, 50, 30, 30);
public static void main(String[] args) {
g2d.drawRect(50, 50, 30, 30);
g2d.draw(new Ellipse2D.Double(0, 100, 30, 30));
}
frame.setVisible(true);
JFrame frame = new JFrame("Mini Tennis");
frame.add(new Game2());
}
frame.setSize(300, 300);
frame.setDefaultCloseOperation(JFrame.EXIT_ON_CLOSE);
}
The paint method receives by parameter a Graphics2D object which extends from Graphics. Graphics is an old class used by AWT which has been replaced with Graphics2D which has more and better functionality. The parameter is still a Graphics type due to compatibility but we will use Graphics2D, so we need to create a variable g2d "Graphics2D g2d = (Graphics2D) g;". Once we have g2d we can use all the Graphics2D methods to draw.
The first thing we do is choose the colour we use to draw: "g2d.setColor(Color.RED);". After, we draw circles and squares.

Positioning in the canvas. Coordinate "x" and "y"

To draw something inside the canvas we should indicate in which position we are going to start painting. For this, each of the points in the canvas has an associated position (x,y) being (0,0) the point of the top-left corner.
The first red circle is painted with "g2d.fillOval(0, 0, 30, 30)": the first two parameters are the position (x,y) and after comes the width and the height. As a result we have a circle with 30 pixels of diameter in the position(0,0).
The empty circle is drawn with "g2d.drawOval(0, 50, 30, 30)": which draws a circle in the position x=0 (left margin) and y=50 (50 pixels below the top margin) with a height of 30 pixels and a width of 30 pixels.
Rectangles are drawn with "g2d.fillRect(50, 0, 30, 30)" and "g2d.drawRect(50, 50, 30, 30)" in a similar way to the circles.
Lastly "g2d.draw(new Ellipse2D.Double(0, 100, 30, 30))" draws the last circle using an Ellipse2D.Double object.
There are a lot of methods in Graphics2D. Some of them will be seen in the following tutorials.

When does the AWT engine call the paint method?

The AWT engine calls the paint method every time the operative system reports that the canvas has to be painted. When the window is created for the first time paint is called. The paint method is also called if we minimize and after we maximize the window and if we change the size of the window with the mouse.
We can watch this behaviour if we put a breakpoint in the first line of the paint method and we run the program in the debug mode.
It is interesting to see that the paint method is ran by the Thread AWT-EventQueue, which is the one in charge of painting the screen.


Game loop and Animation

In this tutorial we are going to see how to move a circle around our canvas. We get this animation by painting the circle in a position and then erasing it and drawing it in a near by position. What we get is a moving circle.

The position of the circle

As we said before, every time we paint something we have to define its position (x,y). To make the circle move, we have to modify the position (x,y) each time and paint the circle in the new position.
In our example, we keep the current position of our circle in two properties called "x" and "y". We also create a method called moveBall() which will increase in 1 both "x" and "y", each time we call it. In the paint method we draw a circle with a diameter of 30 pixels in the position (x,y) given by the properties before described; "g2d.fillOval(x, y, 30, 30);".

Game loop

At the end of the main method we start an infinite cycle "while (true)" where we repeatedly call moveBall() to change the position of the circle and then we call repaint(), which forces de AWT engine to call the paint method to paint again the canvas.
This cycle is known as "Game loop" and carries out two operations:
  1. Update: update of the physics of our world. In our case the update is given by the moveBall() method, which increases the "x" and "y" in 1.
  2. Render: painting of the current state of our world including the changes made before. In our example, it is carried out by the call to the method repaint() and the following call to the "paint" method carried out by the AWT engine, and more specifically by the "event queue thread".
package com.edu4java.minitennis2;

import java.awt.Graphics;
import java.awt.Graphics2D;
import java.awt.RenderingHints;
import javax.swing.JFrame;
import javax.swing.JPanel;

@SuppressWarnings("serial")
public class Game extends JPanel {

 int x = 0;
 int y = 0;

 private void moveBall() {
  x = x + 1;
  y = y + 1;
 }

 @Override
 public void paint(Graphics g) {
  super.paint(g);
  Graphics2D g2d = (Graphics2D) g;
  g2d.setRenderingHint(RenderingHints.KEY_ANTIALIASING,
    RenderingHints.VALUE_ANTIALIAS_ON);
  g2d.fillOval(x, y, 30, 30);
 }

 public static void main(String[] args) throws InterruptedException {
  JFrame frame = new JFrame("Mini Tennis");
  Game game = new Game();
  frame.add(game);
  frame.setSize(300, 400);
  frame.setVisible(true);
  frame.setDefaultCloseOperation(JFrame.EXIT_ON_CLOSE);
  
  while (true) {
   game.moveBall();
   game.repaint();
   Thread.sleep(10);
  }
 }
}
When we run this code we obtain:

Analyzing our paint method

As we said in the last tutorial, this method is run each time the operative system tells the AWT engine that it is necessary to paint the canvas. If we run the repaint() method of a JPanel object, what we are doing is telling the AWT engine to execute the paint method as soon as possible. Calling repaint(), the canvas is painted again and we can see the changes in the position of the circle.
 @Override
 public void paint(Graphics g) {
  super.paint(g);
  Graphics2D g2d = (Graphics2D) g;
  g2d.setRenderingHint(RenderingHints.KEY_ANTIALIASING,
    RenderingHints.VALUE_ANTIALIAS_ON);
  g2d.fillOval(x, y, 30, 30);
 }
The call to "super.paint(g)", cleans the screen and if we comment this line we can see the following effect:
The instruction; "g2d.setRenderingHint(RenderingHints.KEY_ANTIALIASING, RenderingHints.VALUE_ANTIALIAS_ON)" makes the borders of the figures smoother, as you can see in the following graphic. The circle on the left is without applying ANTIALIAS and the one on the right; applying ANTIALIAS.

Analyzing the concurrence and the behaviour of the threads.

At the beginning of the execution of the main method, there is only one thread. We can see this, putting a breakpoint in the first line of the main method.
If we add a breakpoint in the line with; game.repaint() and in the first line of the paint method and we then press F8 (Resume: it orders to continue the execution to the end o till it gets to the following breakpoint), we obtain:

In the left hand side we can see that four threads have been created and two of them are stopped in breakpoints. The main Thread is stopped in line 40 in the game.repaint() instruction. The AWT-EventQueue thread is stopped in the paint method in line 22.
If we select the AWT-EventQueue thread in the Debug view and we press F8 twice, we will see that it no longer stops in the paint method. This is because the operative system doesn´t have a reason to ask for the canvas to repaint itself, once it is initialized.
If we press F6 (the thread execution moves only one line); (this time over the main thread) we will see that the paint method is called again by the AWT-EventQueue thread. We now take out the breakpoint of the paint method, we press F8 and we once again have only the main thread stopped.
The following animation shows us what happens in the canvas each time we press F8 repeatedly. Each call to moveBall() increases the position (x,y) of the circle and the call to repaint() tells the AWT-EventQueue thread to paint again the canvas.
Lastly we are going to analyze the line "Thread.sleep(10)" (the last instruction inside the "Game loop"). For this we comment the line with // and we execute without debug. The result is that the circle is not painted in the canvas. Why does this happen? This is because the main thread takes over the processor and does not share it with the AWT-EventQueue thread, which cannot then call the paint method.
"Thread.sleep(10)" it tells the processor that the thread which is being run must sleep for 10 milliseconds, which allows the processor to execute other threads and in particular the AWT-EventQueue thread which calls the paint method.
I would like to say that this solution is very poor and it only wants to ilustrate the concepts of "game loop", threads and concurrence. There are better ways to manage the game loop and the concurrence in a game, and we will take a look at them in the next tutorials.


Sprites - Speed and direction

All the objects moving in the screen have their own characteristics such as the position (x,y), speed and direction, etc. All of these characteristics can be isolated in an object which we are going to call "Sprite".

Speed and direction

In the last tutorial we got the ball (circle) to move. It moved downwards and to the right, one pixel every round of the Game Loop. When it got to the border of the screen the ball continued, vanishing from the canvas. Now, we are going to make the ball bounce back once it touches de borders of the canvas, changing its direction.
package com.edu4java.minitennis3;

import java.awt.Graphics;
import java.awt.Graphics2D;
import java.awt.RenderingHints;
import javax.swing.JFrame;
import javax.swing.JPanel;

@SuppressWarnings("serial")
public class Game extends JPanel {

 int x = 0;
 int y = 0;
 int xa = 1;
 int ya = 1;

 private void moveBall() {
  if (x + xa < 0)
   xa = 1;
  if (x + xa > getWidth() - 30)
   xa = -1;
  if (y + ya < 0)
   ya = 1;
  if (y + ya > getHeight() - 30)
   ya = -1;
  
  x = x + xa;
  y = y + ya;
 }

 @Override
 public void paint(Graphics g) {
  super.paint(g);
  Graphics2D g2d = (Graphics2D) g;
  g2d.setRenderingHint(RenderingHints.KEY_ANTIALIASING,
    RenderingHints.VALUE_ANTIALIAS_ON);
  g.fillOval(x, y, 30, 30);

 }

 public static void main(String[] args) throws InterruptedException {
  JFrame frame = new JFrame("Mini Tennis");
  Game game = new Game();
  frame.add(game);
  frame.setSize(300, 400);
  frame.setVisible(true);
  frame.setDefaultCloseOperation(JFrame.EXIT_ON_CLOSE);
  
  while (true) {
   game.moveBall();
   game.repaint();
   Thread.sleep(10);
  }
 }
}
In this code we can see that there are two more properties; "xa" and "ya", which represents the speed in which the ball is moving. If xa=1, the ball moves to the right, one pixel every round of the Game Loop, if xa=-1, the ball moves to the left. In the same way ya=1 moves the ball down and ya=-1 moves the ball up. This is done with the lines, "x = x + xa" and "y = y + ya" of the moveBall() method.
Before running the previous instructions, we verify that the ball doesn´t go out of the borders of the canvas. For example, when the ball gets to the right border, or when (x + xa > getWidth() - 30), what we`ll do, is to change the direction of the movement on the "x" axis or what is the same we assign -1 to "xa"; "xa = -1".
 private void moveBall() {
  if (x + xa < 0)
   xa = 1;
  if (x + xa > getWidth() - 30)
   xa = -1;
  if (y + ya < 0)
   ya = 1;
  if (y + ya > getHeight() - 30)
   ya = -1;
  
  x = x + xa;
  y = y + ya;
 }
Each if sentence limits a border of the canvas.

Creation of the "Ball" Sprite

The idea is to create a class called Ball which isolates everything that has to do with the ball. In the following code we can see how we extract all the code from the class Game2, which has to do with the ball, and we add it to our new class Ball.
package com.edu4java.minitennis3;
import java.awt.Graphics;
import java.awt.RenderingHints;
import java.awt.Graphics2D;
import javax.swing.JFrame;
@SuppressWarnings("serial")
import javax.swing.JPanel;
public class Game2 extends JPanel {
@Override
Ball ball = new Ball(this); private void move() { ball.move(); }
g2d.setRenderingHint(RenderingHints.KEY_ANTIALIASING,
public void paint(Graphics g) { super.paint(g); Graphics2D g2d = (Graphics2D) g;
public static void main(String[] args) throws InterruptedException {
RenderingHints.VALUE_ANTIALIAS_ON); ball.paint(g2d); } JFrame frame = new JFrame("Mini Tennis");
frame.setDefaultCloseOperation(JFrame.EXIT_ON_CLOSE);
Game2 game = new Game2(); frame.add(game); frame.setSize(300, 400); frame.setVisible(true); while (true) {
game.move(); game.repaint(); Thread.sleep(10); } } }
The Ball sprite needs the reference to the Game object to obtain the borders of the canvas and in this way know when to change the direction. In the move() method the Ball class calls the methods game.getWidth() and game.getHeight().
package com.edu4java.minitennis3;
public class Ball {
import java.awt.Graphics2D;
int xa = 1;
int x = 0;
int y = 0;
int ya = 1;
public Ball(Game2 game) {
private Game2 game;
this.game= game;
if (x + xa > game.getWidth() - 30)
}
void move() {
if (x + xa < 0)
xa = 1; xa = -1;
if (y + ya > game.getHeight() - 30)
if (y + ya < 0) ya = 1; ya = -1; x = x + xa; y = y + ya; }
}
public void paint(Graphics2D g) { g.fillOval(x, y, 30, 30);
}
If we execute Game2, we will obtain the same result as if we execute the last Game version. The convenience of putting the code of the Ball into a Sprite type class becomes more clear when we include the racquet with a new Sprite, in the next tutorial.


Events. Keyboard input

In this tutorial we will see how the events work and particularly how to obtain, from a java program, the information about keyboard events. We will also explain the concept and the use of the anonymous classes, which are the most common way of managing events in java. We will leave aside the game for a moment and we will explain the capture of events in a simple example.

Keyboard reading example

To read from the keyboard it is necessary to register an object which be in charge of "listening if a key is pressed". This object is known as "Listener" and it will have methods that will be called when someone presses a key. In our example the Listener is registered in the JPanel (or KeyboardExample) using the addKeyListener(KeyListener listener) method.
package com.edu4java.minitennis4;
import java.awt.event.KeyEvent;
import java.awt.event.KeyListener;
import javax.swing.JFrame; import javax.swing.JPanel;
public class KeyboardExample extends JPanel {
@SuppressWarnings("serial") public KeyboardExample() {
setFocusable(true);
KeyListener listener = new MyKeyListener(); addKeyListener(listener); }
KeyboardExample keyboardExample = new KeyboardExample();
public static void main(String[] args) { JFrame frame = new JFrame("Mini Tennis"); frame.add(keyboardExample);
public class MyKeyListener implements KeyListener {
frame.setSize(200, 200); frame.setVisible(true); frame.setDefaultCloseOperation(JFrame.EXIT_ON_CLOSE); } @Override
System.out.println("keyPressed="+KeyEvent.getKeyText(e.getKeyCode()));
public void keyTyped(KeyEvent e) { } @Override public void keyPressed(KeyEvent e) { } @Override public void keyReleased(KeyEvent e) {
}
System.out.println("keyReleased="+KeyEvent.getKeyText(e.getKeyCode())); }
}
In the constructor of the KeyboardExample class, we create the listener and we register it. So that the JPanel object receives the keyboard notifications it is necessary to include the instruction setFocusable(true), which allows KeyboardExample to receive the focus.
public KeyboardExample() {
KeyListener listener = new MyKeyListener();
addKeyListener(listener);
}
setFocusable(true);
The MyKeyListener class is the one I use to create the Listener object. This Listener will write on the console, the name of the method and the key which are affected by the event.
public class MyKeyListener implements KeyListener {
@Override public void keyTyped(KeyEvent e) { }
System.out.println("keyPressed="+KeyEvent.getKeyText(e.getKeyCode()));
@Override public void keyPressed(KeyEvent e) {
public void keyReleased(KeyEvent e) {
} @Override
System.out.println("keyReleased="+KeyEvent.getKeyText(e.getKeyCode()));
}
}
Once it is registered, when KeyboardExample (our JPanel) has the focus and someone presses a key, KeyboardExample will report it to the listener registered. The Listener of our example implements the KeyListener interface which has the keyTyped(), keyPressed() and keyReleased() methods. The keyPressed method will be called each time the key is pressed (and several times if the key is maintained pressed).
The keyTyped(), keyPressed() and keyReleased() methods receive a KeyEvent object as a parameter, which contains information on which key has been pressed or released. Using e.getKeyCode() we can obtain the key and if we pass a key code to KeyEvent.getKeyText(...), we can obtain the text which is associated to the key.

How does the events work in AWT/Swing?

The keyboard and mouse events are controled by the operative system. The AWT engine and in particular the AWT-Windows thread comunicate with the operative system and knows when an event occurs. When a new event comes along it is placed in the "Event queue" so that it is attended by the AWT-EventQueue thread in its turn.
When the AWT-EventQueue thread attends an event, it pays attention at what component it affects and it informs him. In our case the component is the JPanel, which informs all the listeners which are registered to receive notifications for this event.
In the case of the keyboard, the call to addKeyListener(KeyListener listener) is the one which carries out this register. If we want to register an object to listen to the events of the mouse we can use addMouseListener(MouseListener listener).
If you want more information on how do the events work in AWT/Swing, I recommend you the following article.

Anonymous Class

In the previous example the MyKeyListener class will be only used once, so we could replace it with an anonymous class. KeyboardExample2 shows how would it be:
package com.edu4java.minitennis4;
import java.awt.event.KeyEvent;
import java.awt.event.KeyListener;
import javax.swing.JFrame;
import javax.swing.JPanel;
public class KeyboardExample2 extends JPanel {
@SuppressWarnings("serial")
public KeyboardExample2() {
public void keyTyped(KeyEvent e) {
KeyListener listener = new KeyListener() { @Override } @Override
System.out.println("keyPressed="+KeyEvent.getKeyText(e.getKeyCode()));
public void keyPressed(KeyEvent e) { } @Override public void keyReleased(KeyEvent e) {
setFocusable(true);
System.out.println("keyReleased="+KeyEvent.getKeyText(e.getKeyCode())); } }; addKeyListener(listener); } public static void main(String[] args) {
frame.setVisible(true);
JFrame frame = new JFrame("Mini Tennis"); KeyboardExample2 keyboardExample = new KeyboardExample2(); frame.add(keyboardExample); frame.setSize(200, 200);
}
frame.setDefaultCloseOperation(JFrame.EXIT_ON_CLOSE);
}
In the constructor of the KeyboardExample2 class we can se how to replace it
       KeyListener listener = new MyKeyListener();
por
KeyListener listener = new KeyListener() {
@Override
@Override
public void keyTyped(KeyEvent e) {
}
System.out.println("keyPressed="+KeyEvent.getKeyText(e.getKeyCode()));
public void keyPressed(KeyEvent e) { } @Override
System.out.println("keyReleased="+KeyEvent.getKeyText(e.getKeyCode()));
public void keyReleased(KeyEvent e) { }
};
This instruction has the same effect as the previous one. It replaces the definition of the MyKeyListener class for an anonymous class which does exactly the same thing.
The way to create an object from an anonymous class is to replace the name of the class we want to create with a definition which starts with the interface we want to implement, followed with a (), and inside {}, the definition of the class as we do always.
Even if it looks a bit strange, this is the best way of implementing the events Listeners and it is the way you will see it in most of advanced java code.
In the next tutorial we will continue to develop our game.

Game programming: JFrame, JPanel, paint method To paint something we first need a surface where to paint on. This surface or canvas where we are going to paint our first example is a JPanel object. In the same way a canvas needs a frame to hold it, our JPanel will be framed in a window made by the JFrame class.

Game programming: JFrame, JPanel, paint method

To paint something we first need a surface where to paint on. This surface or canvas where we are going to paint our first example is a JPanel object. In the same way a canvas needs a frame to hold it, our JPanel will be framed in a window made by the JFrame class.


Frame: The window

The following code creates a window "Mini Tennis" of 300 pixels by 300 pixels. The window won´t be visible until we call setVisible(true). If we don´t include the last line "frame.setDefaultCloseOperation(JFrame.EXIT_ON_CLOSE)", when we close the window the program won´t finish and will continue running.
package com.edu4java.minitennis1;
import javax.swing.JFrame;

public class Game {
 public static void main(String[] args) {
  JFrame frame = new JFrame("Mini Tennis");
  frame.setSize(300, 300);
  frame.setVisible(true);
  frame.setDefaultCloseOperation(JFrame.EXIT_ON_CLOSE);
 }
}
If we run it we will obtain:
With these few instructions we will obtain a window which can be maximize, minimize, change it´s size with the mouse, etc. When we create a JFrame object we start an engine which manages the user interface. This engine communicates with the operative system both to paint in the screen as to receive information from the keyboard and from the mouse. We will call this engine "AWT Engine" or "Swing Engine" because it is made by these two libraries. In the first java versions only AWT existed and then Swing was added. This engine uses several threads.

What is a thread in java?

A program is executed by just one processor, line by line. Threads allow a program to start several executions at the same time. This is as if, there were several processors running at the same time their own sequence of instructions.
Even though threads and concurrence are very powerful tools, there can be problems when two threads enter the same variables. It is interesting to think that two threads can be running the same code at the same time.
We can think that a thread is like a cook preparing a dish reading a recipe. Two concurrent threads would be like two cooks working in the same kitchen, preparing one dish with the same recipe o with differents recipes. The problems come when both try to use the same frying pan at the same time.

AWT Engine and Thread AWT-EventQueue

The AWT Engine starts several threads which can be seen if we start the aplication with debug and we go to the debug perspective. Each thread is as if it was an independent program running at the same time as the other threads. Further on we will see more about threads, meanwhile I am only interested that you remember the third thread we see in the debug view called "Thread [AWT-EventQueue-0]" this thread is the one in charge of painting the screen and receiving the mouse and keyboard events.


JPanel: The canvas

To be able to paint we want to know WHERE and where is an JPanel object which will be included in the window. We extend the JPanel class to be able to overwrite the paint method which is the method called by the AWT Engine to paint what appears in the screen.
package com.edu4java.minitennis1;

import java.awt.Color;
import java.awt.Graphics;
import java.awt.Graphics2D;
import java.awt.RenderingHints;
import java.awt.geom.Ellipse2D;
import javax.swing.JFrame;
import javax.swing.JPanel;

@SuppressWarnings("serial")
public class Game2 extends JPanel {

 @Override
 public void paint(Graphics g) {
  Graphics2D g2d = (Graphics2D) g;
  g2d.setColor(Color.RED);
  g2d.fillOval(0, 0, 30, 30);
  g2d.drawOval(0, 50, 30, 30);  
  g2d.fillRect(50, 0, 30, 30);
  g2d.drawRect(50, 50, 30, 30);

  g2d.draw(new Ellipse2D.Double(0, 100, 30, 30));
 }
 
 public static void main(String[] args) {
  JFrame frame = new JFrame("Mini Tennis");
  frame.add(new Game2());
  frame.setSize(300, 300);
  frame.setVisible(true);
  frame.setDefaultCloseOperation(JFrame.EXIT_ON_CLOSE);
 }
}
The paint method receives by parameter a Graphics2D object which extends from Graphics. Graphics is an old class used by AWT which has been replaced with Graphics2D which has more and better functionality. The parameter is still a Graphics type due to compatibility but we will use Graphics2D, so we need to create a variable g2d "Graphics2D g2d = (Graphics2D) g;". Once we have g2d we can use all the Graphics2D methods to draw.
The first thing we do is choose the colour we use to draw: "g2d.setColor(Color.RED);". After, we draw circles and squares.

Positioning in the canvas. Coordinate "x" and "y"

To draw something inside the canvas we should indicate in which position we are going to start painting. For this, each of the points in the canvas has an associated position (x,y) being (0,0) the point of the top-left corner.
The first red circle is painted with "g2d.fillOval(0, 0, 30, 30)": the first two parameters are the position (x,y) and after comes the width and the height. As a result we have a circle with 30 pixels of diameter in the position(0,0).
The empty circle is drawn with "g2d.drawOval(0, 50, 30, 30)": which draws a circle in the position x=0 (left margin) and y=50 (50 pixels below the top margin) with a height of 30 pixels and a width of 30 pixels.
Rectangles are drawn with "g2d.fillRect(50, 0, 30, 30)" and "g2d.drawRect(50, 50, 30, 30)" in a similar way to the circles.
Lastly "g2d.draw(new Ellipse2D.Double(0, 100, 30, 30))" draws the last circle using an Ellipse2D.Double object.
There are a lot of methods in Graphics2D. Some of them will be seen in the following tutorials.

When does the AWT engine call the paint method?

The AWT engine calls the paint method every time the operative system reports that the canvas has to be painted. When the window is created for the first time paint is called. The paint method is also called if we minimize and after we maximize the window and if we change the size of the window with the mouse.
We can watch this behaviour if we put a breakpoint in the first line of the paint method and we run the program in the debug mode.
It is interesting to see that the paint method is ran by the Thread AWT-EventQueue, which is the one in charge of painting the screen.

الأربعاء، 29 أبريل 2015

Applets and Applications

                          Applets and Applications
Java applications fall into two main groups: applets and applications.
Applets, as you have learned, are Java programs that are downloaded over the World Wide Web
and executed by a Web browser on the reader’s machine. Applets depend on a Java-capable
browser in order to run (although they can also be viewed using a tool called the appletviewer,
which you’ll learn about later today).
Java applications are more general programs written in the Java language. Java applications don’t
require a browser to run, and in fact, Java can be used to create most other kinds of applications
that you would normally use a more conventional programming language to create. HotJava
itself is a Java application.
A single Java program can be an applet or an application or both, depending on how you write
that program and the capabilities that program uses. Throughout this first week, you’ll be
writing mostly HotJava applications; then you’ll apply what you’ve learned to write applets in
Week 2. If you’re eager to get started with applets, be patient. Everything that you learn while
you’re creating simple Java applications will apply to creating applets, and it’s easier to start with
the basics before moving onto the hard stuff

الثلاثاء، 28 أبريل 2015

.Top 3 reasons Why You would Learn Java ..?


? .. Why Learn Java 


At the moment, probably the most compelling reason to learn Java—and probably the reason
you reading this post  is that HotJava applets are written in Java. Even if that were not the case,
Java as a language has significant advantages over other languages and other programming
environments that make it suitable for just about any programming task. This section describes
some of those advantages

Java Is Platform-Independent

Platform independence is one of the most significant advantages that Java has over other
programming languages, particularly for systems that need to work on many different platforms.
Java is platform-independent at both the source and the binary level.
Platform-independence is a program’s capability of moving easily from one computer
system to another.

  Java Is Object-Oriented
To some, object-oriented programming (OOP) technique is merely a way of organizing
programs, and it can be accomplished using any language. Working with a real object-oriented
language and programming environment, however, enables you to take full advantage of objectoriented
methodology and its capabilities of creating flexible, modular programs and reusing
code.
Many of Java’s object-oriented concepts are inherited from C++, the language on which it is
based, but it borrows many concepts from other object-oriented languages as well. Like most
object-oriented programming languages, Java includes a set of class libraries that provide basic
data types, system input and output capabilities, and other utility functions. These basic classes
are part of the Java development kit, which also has classes to support networking, common
Internet protocols, and user interface toolkit functions. Because these class libraries are written
in Java, they are portable across platforms as all Java applications are.
 ..
 Java Is Easy to Learn
In addition to its portability and object-orientation, one of Java’s initial design goals was to be
small and simple, and therefore easier to write, easier to compile, easier to debug, and, best of
all, easy to learn. Keeping the language small also makes it more robust because there are fewer
chances for programmers to make difficult-to-find mistakes. Despite its size and simple design,
however, Java still has a great deal of power and flexibility.

Java is modeled after C and C++, and much of the syntax and object-oriented structure is
borrowed from the latter. If you are familiar with C++, learning Java will be particularly easy for
you, because you have most of the foundation already.

Although Java looks similar to C and C++, most of the more complex parts of those languages
have been excluded from Java, making the language simpler without sacrificing much of its

power. There are no pointers in Java, nor is there pointer arithmetic. Strings and arrays are real
objects in Java. Memory management is automatic. To an experienced programmer, these

omissions may be difficult to get used to, but to beginners or programmers who have worked
in other languages, they make the Java language far easier to learn.
 ... Hope You Find This Usefull.

Stuff programmers want to know about Linux


 Stuff programmers want to know about Linux


These features make Linux a productive software-
development environment:
✓ GNU C compiler (gcc): Compiles ANSIstandard
C programs.
✓ GNU C++ compiler (g++): Supports ANSIstandard
C++ features.
✓ GNU compiler for Java (gcj): Compiles
programs written in the Java programming
language.
✓ GNU make utility: Enables you to compile
and link large programs.
✓ GNU debugger (gdb): Enables you to step
through your program to find problems and
to determine where and how a program
failed. (The failed program’s memory image
is saved in the core file; gdb can examine
this file.)
✓ GNU profiling utility (gprof): Enables you
to determine the degree to which a piece
of software uses your computer’s processor
time.
✓ Subversion, Concurrent Versions System
(CVS), and Revision Control System (RCS):
Maintains version information and controls
access to the source files so that two programmers
don’t inadvertently modify the
same source file at the same time.
✓ GNU emacs editor: Prepares source files
and even launches a compile-link process
to build the program.
✓ Perl: Enables you to write scripts to accomplish
a specific task, tying together many
smaller programs with Linux commands.
✓ Tool Command Language and its graphical
toolkit (Tcl/Tk): Enables you to build
graphical applications rapidly.
✓ Python: Enables you to write code in an
interpreted programming language comparable
to Perl and Tcl. (For example, the
Fedora Core installation program, called
anaconda, is written in Python.)
✓ Dynamically linked, shared libraries:
Allows your actual program files to be
much smaller because all the library
code that several programs may need is
shared — with only one copy loaded in the
system’s memory.