Game programming: JFrame, JPanel, paint method
To paint something we first need a surface where to paint on. This surface or canvas where we are going to paint our first example is a JPanel object. In the same way a canvas needs a frame to hold it, our JPanel will be framed in a window made by the JFrame class.
JFrame: The window
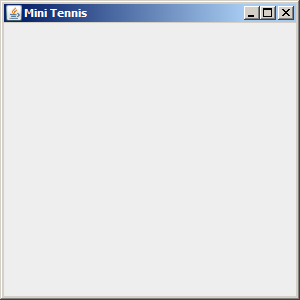
The following code creates a window "Mini Tennis" of 300 pixels by 300 pixels. The window won´t be visible until we call setVisible(true). If we don´t include the last line "frame.setDefaultCloseOperation(JFrame.EXIT_ON_CLOSE)", when we close the window the program won´t finish and will continue running.
package com.edu4java.minitennis1;
import javax.swing.JFrame;

public class Game {
 public static void main(String[] args) {
  JFrame frame = new JFrame("Mini Tennis");
  frame.setSize(300, 300);
  frame.setVisible(true);
  frame.setDefaultCloseOperation(JFrame.EXIT_ON_CLOSE);
 }
}
If we run it we will obtain:
With these few instructions we will obtain a window which can be maximize, minimize, change it´s size with the mouse, etc. When we create a JFrame object we start an engine which manages the user interface. This engine communicates with the operative system both to paint in the screen as to receive information from the keyboard and from the mouse. We will call this engine "AWT Engine" or "Swing Engine" because it is made by these two libraries. In the first java versions only AWT existed and then Swing was added. This engine uses several threads.
What is a thread in java?
A program is executed by just one processor, line by line. Threads allow a program to start several executions at the same time. This is as if, there were several processors running at the same time their own sequence of instructions.
Even though threads and concurrence are very powerful tools, there can be problems when two threads enter the same variables. It is interesting to think that two threads can be running the same code at the same time.
We can think that a thread is like a cook preparing a dish reading a recipe. Two concurrent threads would be like two cooks working in the same kitchen, preparing one dish with the same recipe o with differents recipes. The problems come when both try to use the same frying pan at the same time.
AWT Engine and Thread AWT-EventQueue
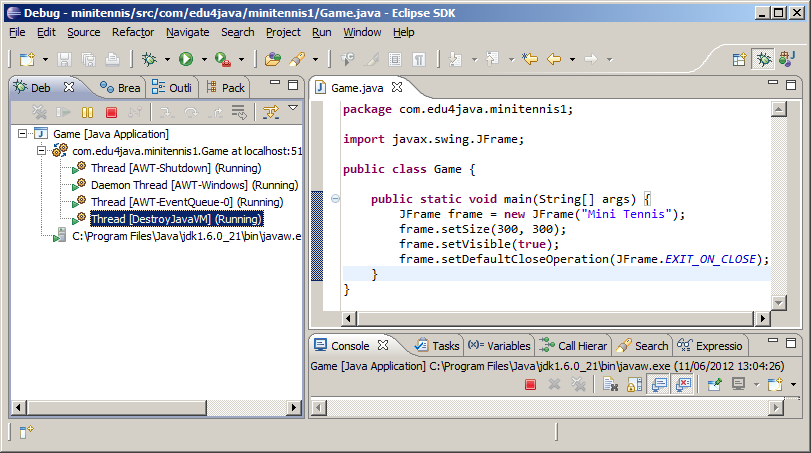
The AWT Engine starts several threads which can be seen if we start the aplication with debug and we go to the debug perspective. Each thread is as if it was an independent program running at the same time as the other threads. Further on we will see more about threads, meanwhile I am only interested that you remember the third thread we see in the debug view called "Thread [AWT-EventQueue-0]" this thread is the one in charge of painting the screen and receiving the mouse and keyboard events.
JPanel: The canvas
To be able to paint we want to know WHERE and where is an JPanel object which will be included in the window. We extend the JPanel class to be able to overwrite the paint method which is the method called by the AWT Engine to paint what appears in the screen.
package com.edu4java.minitennis1;import java.awt.Color;import java.awt.Graphics2D;import java.awt.Graphics;import java.awt.geom.Ellipse2D;import java.awt.RenderingHints;@SuppressWarnings("serial")import javax.swing.JFrame;import javax.swing.JPanel;public void paint(Graphics g) {public class Game2 extends JPanel {Graphics2D g2d = (Graphics2D) g;@Overrideg2d.fillRect(50, 0, 30, 30);g2d.setColor(Color.RED);g2d.fillOval(0, 0, 30, 30);g2d.drawOval(0, 50, 30, 30);public static void main(String[] args) {g2d.drawRect(50, 50, 30, 30);g2d.draw(new Ellipse2D.Double(0, 100, 30, 30));}frame.setVisible(true);JFrame frame = new JFrame("Mini Tennis");frame.add(new Game2());}frame.setSize(300, 300);frame.setDefaultCloseOperation(JFrame.EXIT_ON_CLOSE);}
The paint method receives by parameter a Graphics2D object which extends from Graphics. Graphics is an old class used by AWT which has been replaced with Graphics2D which has more and better functionality. The parameter is still a Graphics type due to compatibility but we will use Graphics2D, so we need to create a variable g2d "Graphics2D g2d = (Graphics2D) g;". Once we have g2d we can use all the Graphics2D methods to draw.
The first thing we do is choose the colour we use to draw: "g2d.setColor(Color.RED);". After, we draw circles and squares.
Positioning in the canvas. Coordinate "x" and "y"
To draw something inside the canvas we should indicate in which position we are going to start painting. For this, each of the points in the canvas has an associated position (x,y) being (0,0) the point of the top-left corner.
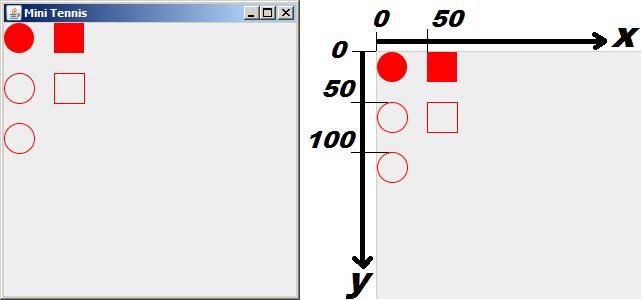
The first red circle is painted with "g2d.fillOval(0, 0, 30, 30)": the first two parameters are the position (x,y) and after comes the width and the height. As a result we have a circle with 30 pixels of diameter in the position(0,0).
The empty circle is drawn with "g2d.drawOval(0, 50, 30, 30)": which draws a circle in the position x=0 (left margin) and y=50 (50 pixels below the top margin) with a height of 30 pixels and a width of 30 pixels.
Rectangles are drawn with "g2d.fillRect(50, 0, 30, 30)" and "g2d.drawRect(50, 50, 30, 30)" in a similar way to the circles.
Lastly "g2d.draw(new Ellipse2D.Double(0, 100, 30, 30))" draws the last circle using an Ellipse2D.Double object.
There are a lot of methods in Graphics2D. Some of them will be seen in the following tutorials.
When does the AWT engine call the paint method?
The AWT engine calls the paint method every time the operative system reports that the canvas has to be painted. When the window is created for the first time paint is called. The paint method is also called if we minimize and after we maximize the window and if we change the size of the window with the mouse.
We can watch this behaviour if we put a breakpoint in the first line of the paint method and we run the program in the debug mode.
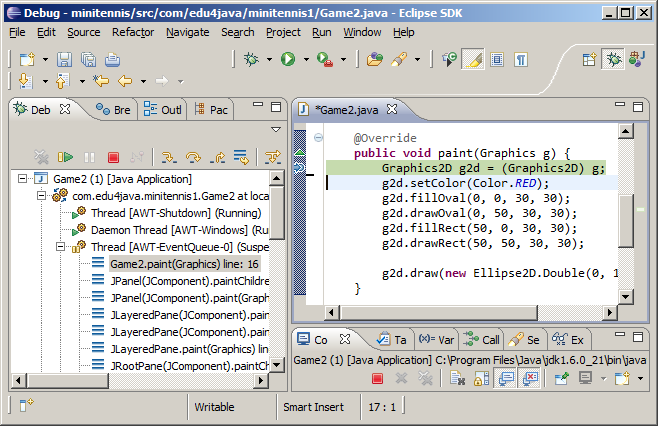
It is interesting to see that the paint method is ran by the Thread AWT-EventQueue, which is the one in charge of painting the screen.
Game loop and Animation
In this tutorial we are going to see how to move a circle around our canvas. We get this animation by painting the circle in a position and then erasing it and drawing it in a near by position. What we get is a moving circle.
The position of the circle
As we said before, every time we paint something we have to define its position (x,y). To make the circle move, we have to modify the position (x,y) each time and paint the circle in the new position.
In our example, we keep the current position of our circle in two properties called "x" and "y". We also create a method called moveBall() which will increase in 1 both "x" and "y", each time we call it. In the paint method we draw a circle with a diameter of 30 pixels in the position (x,y) given by the properties before described; "g2d.fillOval(x, y, 30, 30);".
Game loop
At the end of the main method we start an infinite cycle "while (true)" where we repeatedly call moveBall() to change the position of the circle and then we call repaint(), which forces de AWT engine to call the paint method to paint again the canvas.
This cycle is known as "Game loop" and carries out two operations:
- Update: update of the physics of our world. In our case the update is given by the moveBall() method, which increases the "x" and "y" in 1.
- Render: painting of the current state of our world including the changes made before. In our example, it is carried out by the call to the method repaint() and the following call to the "paint" method carried out by the AWT engine, and more specifically by the "event queue thread".
package com.edu4java.minitennis2;

import java.awt.Graphics;
import java.awt.Graphics2D;
import java.awt.RenderingHints;
import javax.swing.JFrame;
import javax.swing.JPanel;

@SuppressWarnings("serial")
public class Game extends JPanel {

 int x = 0;
 int y = 0;

 private void moveBall() {
  x = x + 1;
  y = y + 1;
 }

 @Override
 public void paint(Graphics g) {
  super.paint(g);
  Graphics2D g2d = (Graphics2D) g;
  g2d.setRenderingHint(RenderingHints.KEY_ANTIALIASING,
    RenderingHints.VALUE_ANTIALIAS_ON);
  g2d.fillOval(x, y, 30, 30);
 }

 public static void main(String[] args) throws InterruptedException {
  JFrame frame = new JFrame("Mini Tennis");
  Game game = new Game();
  frame.add(game);
  frame.setSize(300, 400);
  frame.setVisible(true);
  frame.setDefaultCloseOperation(JFrame.EXIT_ON_CLOSE);

  while (true) {
   game.moveBall();
   game.repaint();
   Thread.sleep(10);
  }
 }
}
When we run this code we obtain:
Analyzing our paint method
As we said in the last tutorial, this method is run each time the operative system tells the AWT engine that it is necessary to paint the canvas. If we run the repaint() method of a JPanel object, what we are doing is telling the AWT engine to execute the paint method as soon as possible. Calling repaint(), the canvas is painted again and we can see the changes in the position of the circle.
 @Override
 public void paint(Graphics g) {
  super.paint(g);
  Graphics2D g2d = (Graphics2D) g;
  g2d.setRenderingHint(RenderingHints.KEY_ANTIALIASING,
    RenderingHints.VALUE_ANTIALIAS_ON);
  g2d.fillOval(x, y, 30, 30);
 }
The call to "super.paint(g)", cleans the screen and if we comment this line we can see the following effect:

The instruction; "g2d.setRenderingHint(RenderingHints.KEY_ANTIALIASING, RenderingHints.VALUE_ANTIALIAS_ON)" makes the borders of the figures smoother, as you can see in the following graphic. The circle on the left is without applying ANTIALIAS and the one on the right; applying ANTIALIAS.

Analyzing the concurrence and the behaviour of the threads.
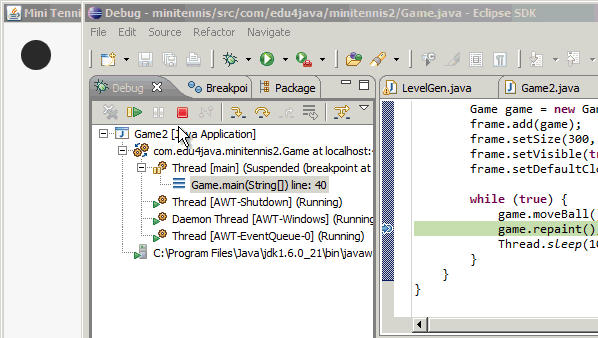
At the beginning of the execution of the main method, there is only one thread. We can see this, putting a breakpoint in the first line of the main method.
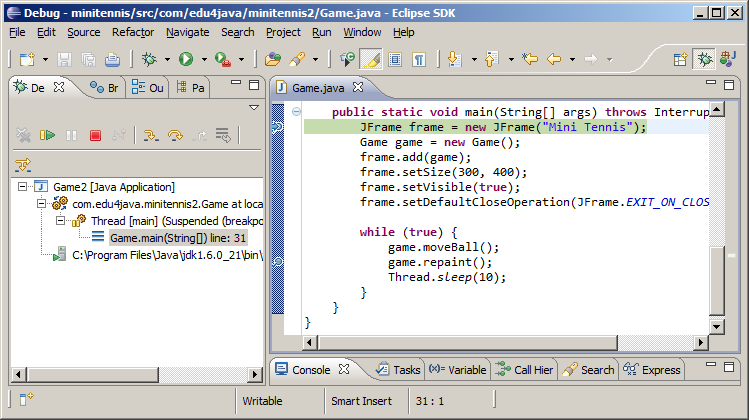
If we add a breakpoint in the line with; game.repaint() and in the first line of the paint method and we then press F8 (Resume: it orders to continue the execution to the end o till it gets to the following breakpoint), we obtain:
In the left hand side we can see that four threads have been created and two of them are stopped in breakpoints. The main Thread is stopped in line 40 in the game.repaint() instruction. The AWT-EventQueue thread is stopped in the paint method in line 22.
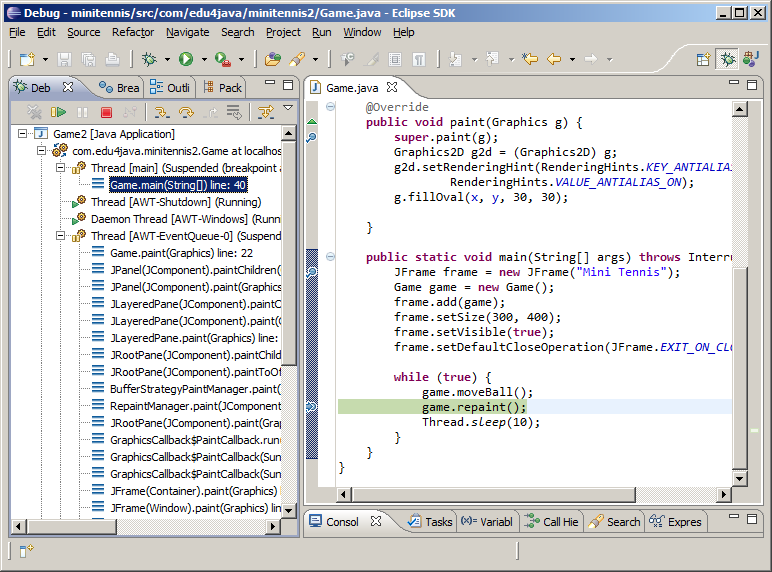
If we select the AWT-EventQueue thread in the Debug view and we press F8 twice, we will see that it no longer stops in the paint method. This is because the operative system doesn´t have a reason to ask for the canvas to repaint itself, once it is initialized.
If we press F6 (the thread execution moves only one line); (this time over the main thread) we will see that the paint method is called again by the AWT-EventQueue thread. We now take out the breakpoint of the paint method, we press F8 and we once again have only the main thread stopped.
The following animation shows us what happens in the canvas each time we press F8 repeatedly. Each call to moveBall() increases the position (x,y) of the circle and the call to repaint() tells the AWT-EventQueue thread to paint again the canvas.
Lastly we are going to analyze the line "Thread.sleep(10)" (the last instruction inside the "Game loop"). For this we comment the line with // and we execute without debug. The result is that the circle is not painted in the canvas. Why does this happen? This is because the main thread takes over the processor and does not share it with the AWT-EventQueue thread, which cannot then call the paint method.
"Thread.sleep(10)" it tells the processor that the thread which is being run must sleep for 10 milliseconds, which allows the processor to execute other threads and in particular the AWT-EventQueue thread which calls the paint method.
I would like to say that this solution is very poor and it only wants to ilustrate the concepts of "game loop", threads and concurrence. There are better ways to manage the game loop and the concurrence in a game, and we will take a look at them in the next tutorials.
Sprites - Speed and direction
All the objects moving in the screen have their own characteristics such as the position (x,y), speed and direction, etc. All of these characteristics can be isolated in an object which we are going to call "Sprite".
Speed and direction
In the last tutorial we got the ball (circle) to move. It moved downwards and to the right, one pixel every round of the Game Loop. When it got to the border of the screen the ball continued, vanishing from the canvas. Now, we are going to make the ball bounce back once it touches de borders of the canvas, changing its direction.
package com.edu4java.minitennis3;

import java.awt.Graphics;
import java.awt.Graphics2D;
import java.awt.RenderingHints;
import javax.swing.JFrame;
import javax.swing.JPanel;

@SuppressWarnings("serial")
public class Game extends JPanel {

 int x = 0;
 int y = 0;
 int xa = 1;
 int ya = 1;

 private void moveBall() {
  if (x + xa < 0)
   xa = 1;
  if (x + xa > getWidth() - 30)
   xa = -1;
  if (y + ya < 0)
   ya = 1;
  if (y + ya > getHeight() - 30)
   ya = -1;

  x = x + xa;
  y = y + ya;
 }

 @Override
 public void paint(Graphics g) {
  super.paint(g);
  Graphics2D g2d = (Graphics2D) g;
  g2d.setRenderingHint(RenderingHints.KEY_ANTIALIASING,
    RenderingHints.VALUE_ANTIALIAS_ON);
  g.fillOval(x, y, 30, 30);

 }

 public static void main(String[] args) throws InterruptedException {
  JFrame frame = new JFrame("Mini Tennis");
  Game game = new Game();
  frame.add(game);
  frame.setSize(300, 400);
  frame.setVisible(true);
  frame.setDefaultCloseOperation(JFrame.EXIT_ON_CLOSE);

  while (true) {
   game.moveBall();
   game.repaint();
   Thread.sleep(10);
  }
 }
}
In this code we can see that there are two more properties; "xa" and "ya", which represents the speed in which the ball is moving. If xa=1, the ball moves to the right, one pixel every round of the Game Loop, if xa=-1, the ball moves to the left. In the same way ya=1 moves the ball down and ya=-1 moves the ball up. This is done with the lines, "x = x + xa" and "y = y + ya" of the moveBall() method.
Before running the previous instructions, we verify that the ball doesn´t go out of the borders of the canvas. For example, when the ball gets to the right border, or when (x + xa > getWidth() - 30), what we`ll do, is to change the direction of the movement on the "x" axis or what is the same we assign -1 to "xa"; "xa = -1".
 private void moveBall() {
  if (x + xa < 0)
   xa = 1;
  if (x + xa > getWidth() - 30)
   xa = -1;
  if (y + ya < 0)
   ya = 1;
  if (y + ya > getHeight() - 30)
   ya = -1;

  x = x + xa;
  y = y + ya;
 }
Each if sentence limits a border of the canvas.
Creation of the "Ball" Sprite
The idea is to create a class called Ball which isolates everything that has to do with the ball. In the following code we can see how we extract all the code from the class Game2, which has to do with the ball, and we add it to our new class Ball.
package com.edu4java.minitennis3;import java.awt.Graphics;import java.awt.RenderingHints;import java.awt.Graphics2D;import javax.swing.JFrame;@SuppressWarnings("serial")import javax.swing.JPanel;public class Game2 extends JPanel {@OverrideBall ball = new Ball(this); private void move() { ball.move(); }g2d.setRenderingHint(RenderingHints.KEY_ANTIALIASING,public void paint(Graphics g) { super.paint(g); Graphics2D g2d = (Graphics2D) g;public static void main(String[] args) throws InterruptedException {RenderingHints.VALUE_ANTIALIAS_ON); ball.paint(g2d); } JFrame frame = new JFrame("Mini Tennis");frame.setDefaultCloseOperation(JFrame.EXIT_ON_CLOSE);Game2 game = new Game2(); frame.add(game); frame.setSize(300, 400); frame.setVisible(true); while (true) {game.move(); game.repaint(); Thread.sleep(10); } } }
The Ball sprite needs the reference to the Game object to obtain the borders of the canvas and in this way know when to change the direction. In the move() method the Ball class calls the methods game.getWidth() and game.getHeight().
package com.edu4java.minitennis3;public class Ball {import java.awt.Graphics2D;int xa = 1;int x = 0;int y = 0;int ya = 1;public Ball(Game2 game) {private Game2 game;this.game= game;if (x + xa > game.getWidth() - 30)}void move() {if (x + xa < 0)xa = 1; xa = -1;if (y + ya > game.getHeight() - 30)if (y + ya < 0) ya = 1; ya = -1; x = x + xa; y = y + ya; }}public void paint(Graphics2D g) { g.fillOval(x, y, 30, 30);}
If we execute Game2, we will obtain the same result as if we execute the last Game version. The convenience of putting the code of the Ball into a Sprite type class becomes more clear when we include the racquet with a new Sprite, in the next tutorial.
Events. Keyboard input
In this tutorial we will see how the events work and particularly how to obtain, from a java program, the information about keyboard events. We will also explain the concept and the use of the anonymous classes, which are the most common way of managing events in java. We will leave aside the game for a moment and we will explain the capture of events in a simple example.
Keyboard reading example
To read from the keyboard it is necessary to register an object which be in charge of "listening if a key is pressed". This object is known as "Listener" and it will have methods that will be called when someone presses a key. In our example the Listener is registered in the JPanel (or KeyboardExample) using the addKeyListener(KeyListener listener) method.
package com.edu4java.minitennis4;import java.awt.event.KeyEvent;import java.awt.event.KeyListener;import javax.swing.JFrame; import javax.swing.JPanel;public class KeyboardExample extends JPanel {@SuppressWarnings("serial") public KeyboardExample() {setFocusable(true);KeyListener listener = new MyKeyListener(); addKeyListener(listener); }KeyboardExample keyboardExample = new KeyboardExample();public static void main(String[] args) { JFrame frame = new JFrame("Mini Tennis"); frame.add(keyboardExample);public class MyKeyListener implements KeyListener {frame.setSize(200, 200); frame.setVisible(true); frame.setDefaultCloseOperation(JFrame.EXIT_ON_CLOSE); } @OverrideSystem.out.println("keyPressed="+KeyEvent.getKeyText(e.getKeyCode()));public void keyTyped(KeyEvent e) { } @Override public void keyPressed(KeyEvent e) { } @Override public void keyReleased(KeyEvent e) {}System.out.println("keyReleased="+KeyEvent.getKeyText(e.getKeyCode())); }}
In the constructor of the KeyboardExample class, we create the listener and we register it. So that the JPanel object receives the keyboard notifications it is necessary to include the instruction setFocusable(true), which allows KeyboardExample to receive the focus.
public KeyboardExample() {KeyListener listener = new MyKeyListener();addKeyListener(listener);}setFocusable(true);
The MyKeyListener class is the one I use to create the Listener object. This Listener will write on the console, the name of the method and the key which are affected by the event.
public class MyKeyListener implements KeyListener {@Override public void keyTyped(KeyEvent e) { }System.out.println("keyPressed="+KeyEvent.getKeyText(e.getKeyCode()));@Override public void keyPressed(KeyEvent e) {public void keyReleased(KeyEvent e) {} @OverrideSystem.out.println("keyReleased="+KeyEvent.getKeyText(e.getKeyCode()));}}
Once it is registered, when KeyboardExample (our JPanel) has the focus and someone presses a key, KeyboardExample will report it to the listener registered. The Listener of our example implements the KeyListener interface which has the keyTyped(), keyPressed() and keyReleased() methods. The keyPressed method will be called each time the key is pressed (and several times if the key is maintained pressed).
The keyTyped(), keyPressed() and keyReleased() methods receive a KeyEvent object as a parameter, which contains information on which key has been pressed or released. Using e.getKeyCode() we can obtain the key and if we pass a key code to KeyEvent.getKeyText(...), we can obtain the text which is associated to the key.
How does the events work in AWT/Swing?
The keyboard and mouse events are controled by the operative system. The AWT engine and in particular the AWT-Windows thread comunicate with the operative system and knows when an event occurs. When a new event comes along it is placed in the "Event queue" so that it is attended by the AWT-EventQueue thread in its turn.
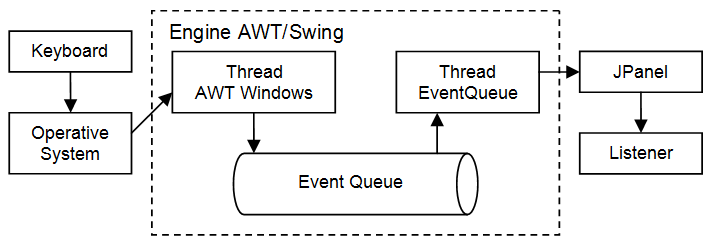
When the AWT-EventQueue thread attends an event, it pays attention at what component it affects and it informs him. In our case the component is the JPanel, which informs all the listeners which are registered to receive notifications for this event.
In the case of the keyboard, the call to addKeyListener(KeyListener listener) is the one which carries out this register. If we want to register an object to listen to the events of the mouse we can use addMouseListener(MouseListener listener).
If you want more information on how do the events work in AWT/Swing, I recommend you the following article.
Anonymous Class
In the previous example the MyKeyListener class will be only used once, so we could replace it with an anonymous class. KeyboardExample2 shows how would it be:
package com.edu4java.minitennis4;import java.awt.event.KeyEvent;import java.awt.event.KeyListener;import javax.swing.JFrame;import javax.swing.JPanel;public class KeyboardExample2 extends JPanel {@SuppressWarnings("serial")public KeyboardExample2() {public void keyTyped(KeyEvent e) {KeyListener listener = new KeyListener() { @Override } @OverrideSystem.out.println("keyPressed="+KeyEvent.getKeyText(e.getKeyCode()));public void keyPressed(KeyEvent e) { } @Override public void keyReleased(KeyEvent e) {setFocusable(true);System.out.println("keyReleased="+KeyEvent.getKeyText(e.getKeyCode())); } }; addKeyListener(listener); } public static void main(String[] args) {frame.setVisible(true);JFrame frame = new JFrame("Mini Tennis"); KeyboardExample2 keyboardExample = new KeyboardExample2(); frame.add(keyboardExample); frame.setSize(200, 200);}frame.setDefaultCloseOperation(JFrame.EXIT_ON_CLOSE);}
In the constructor of the KeyboardExample2 class we can se how to replace it
KeyListener listener = new MyKeyListener();
por
KeyListener listener = new KeyListener() {@Override@Overridepublic void keyTyped(KeyEvent e) {}System.out.println("keyPressed="+KeyEvent.getKeyText(e.getKeyCode()));public void keyPressed(KeyEvent e) { } @OverrideSystem.out.println("keyReleased="+KeyEvent.getKeyText(e.getKeyCode()));public void keyReleased(KeyEvent e) { }};
This instruction has the same effect as the previous one. It replaces the definition of the MyKeyListener class for an anonymous class which does exactly the same thing.
The way to create an object from an anonymous class is to replace the name of the class we want to create with a definition which starts with the interface we want to implement, followed with a (), and inside {}, the definition of the class as we do always.
Even if it looks a bit strange, this is the best way of implementing the events Listeners and it is the way you will see it in most of advanced java code.
In the next tutorial we will continue to develop our game.
ليست هناك تعليقات:
إرسال تعليق